Ansible NavigatorでAnsible Vaultの使い方

ansible-navigatorコマンドを利用してAnsible Vaultで暗号化したい

概要

  • ansible-navigatorコマンドを用いたAnsible Vaultの利用方法

    環境

  • ansible-navigator
  • 24.2.0

    Ansible NavigatorでAnsible Vault実行

  • 下記のような記載で今まで通りのansible-vaultコマンドを使うことができる
ansible-navigator exec -- ansible-vault
  • 任意の文字列を暗号化する場合は以下
ansible-navigator exec -- ansible-vault encrypt_string 'password'

分からないなりにAWXでLDAP連携をやってみる

LDAPよくわからないけどAWXでLDAP連携をやりたい

概要

  • AWXでLDAP連携を実現する手順を記載

環境

AWXにLDAP連携設定を実装

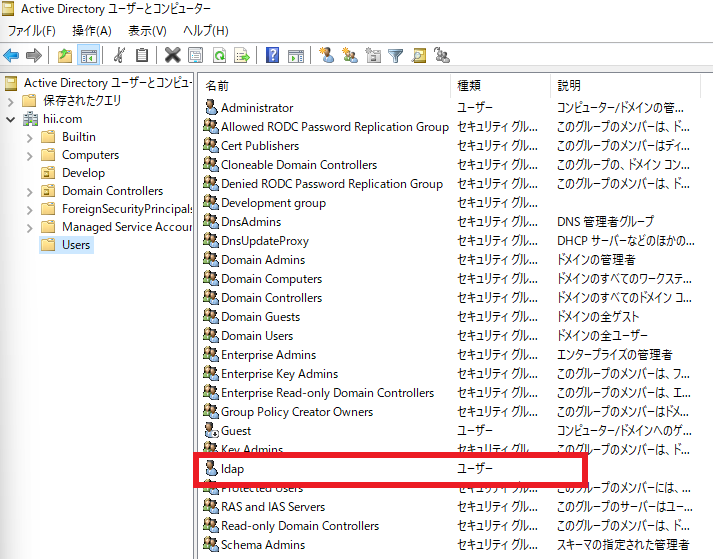
Active DirectoryLDAP連携用ユーザー作成

  1. LDAP連携用にldapユーザーを作成

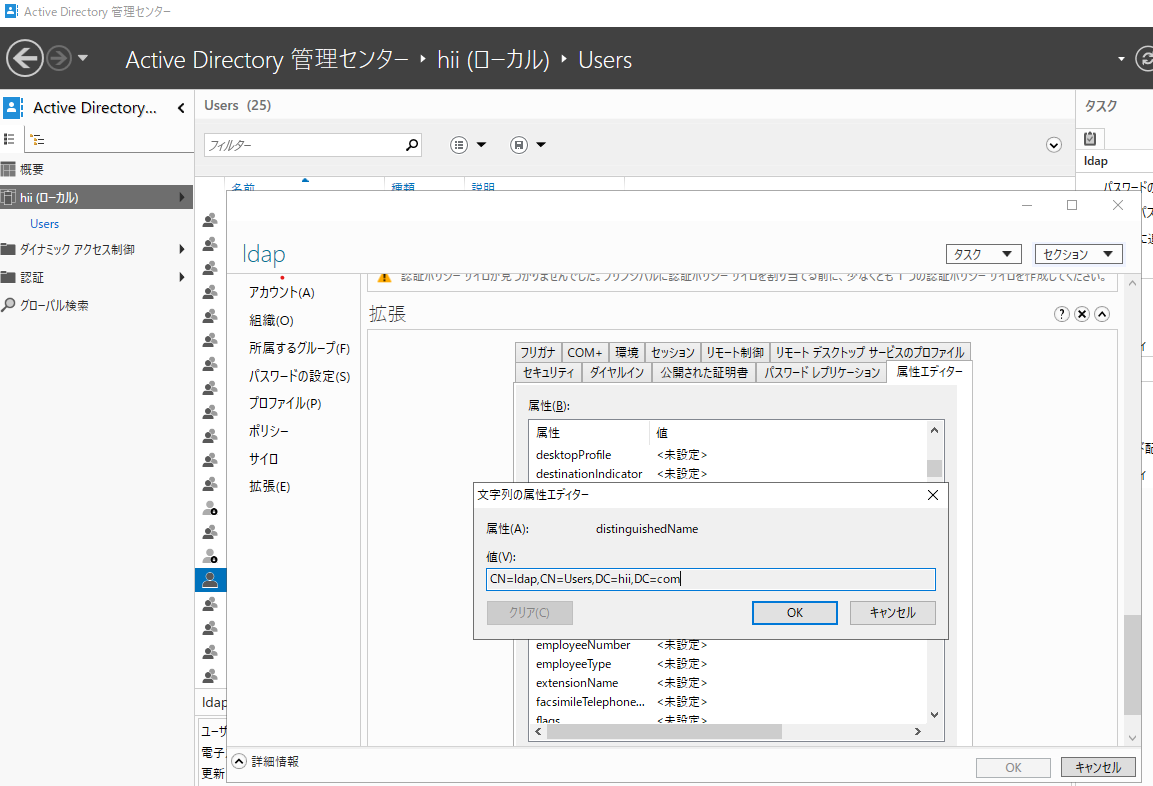
2. [サーバーマネージャー]-[ツール]から[Active Direcotory管理センター]を開く 3. LDAP連携用に作成したldapユーザーのプロパティを開く 4. [拡張]項目にある[属性エディター]タブからdistinguishedNameを確認します。

AWXサーバからLDAP接続確認

  • AWXサーバでldapsearchコマンドを実行し、Active DirecotoryにLDAP接続できることを確認
  ldapsearch -x -H ldap://192.168.89.144 -D "CN=ldap,CN=Users,DC=hii,DC=com" -b "dc=hii,dc=com" -w ldap
  • ldapsearchコマンドのオプション

    オプション
    -H LDAPサーバのURL
    -D bind DN
    -b base DN(どのツリーから探すか)
    -w bind DNで使用するユーザのパスワード
  • search result として、0 Success が出力されていれば正しく接続できています。

  # search result
  search: 2
  result: 0 Success
  • 接続できているのでAWX管理画面にて設定を実施していきます。

AWXにLDAP設定

  1. AWXにログインし、[設定]-[LDAP設定]-[デフォルト]画面にて、各項目に値を入力し[保存]します。

    • LDAPサーバーURIldap://192.168.89.144
    • LDAPバインドDN:CN=ldap,CN=Users,DC=hii,DC=com
    • LDAPバインドパスワード:
    • LDAPユーザーDNテンプレート:空欄
    • LDAPグループタイプ:ActiveDirectoryGroupType
    • LDAP要求グループ:空欄
    • LDAP拒否グループ:空欄
    • LDAPStart TLS:オフ
    • LDAPユーザー検索

      [
        "DC=hii,DC=com",
        "SCOPE_SUBTREE",
        "(sAMAccountName=%(user)s)"
      ]
      
    • LDAPグループ検索

      [
        "DC=hii,DC=com",
        "SCOPE_SUBTREE",
        "(objectClass=group)"
      ]
      
    • LDAPユーザー属性マップ

      {
        "email": "mail",
        "first_name": "givenName",
        "last_name": "sn"
      }
      
    • LDAPグループタイプパラメータ

      {
        "name_attr": "cn"
      }
      
    • LDAPユーザーフラグ(グループ別):デフォルト設定

    • LDAP組織マップ:デフォルト設定
    • LDAPチームマップ:デフォルト設定

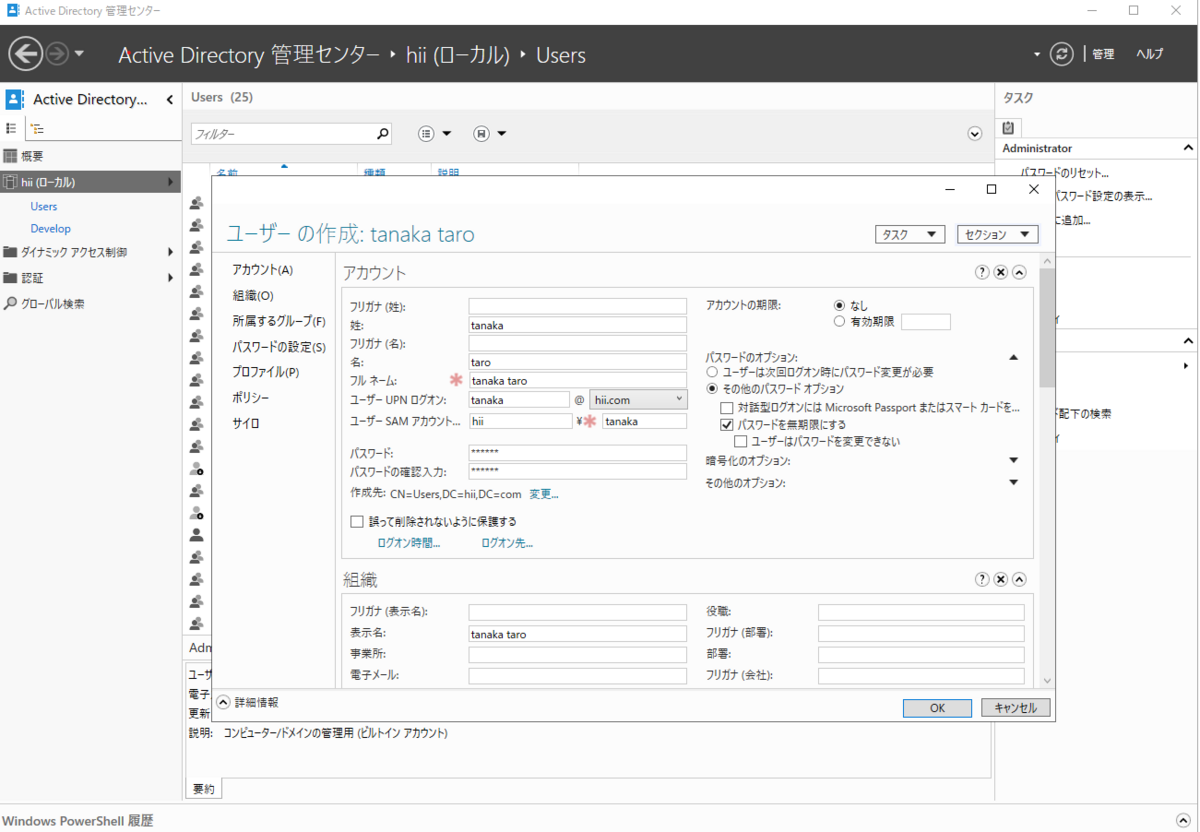
Active Directoryでユーザー作成

Automation Hub接続に使用するオフライントークン期限切れ防止のPlaybook作成

Automation Hub接続に使用するオフライントークンは30日間アクティブでない状態が続くと期限切れとなってしまう。
公式ではcurlコマンドを実行すると記載があるがどうせならPlaybookにしてみる

概要

  • 公式で提供されるcurlコマンドをもとにuriモジュールを使用したPlaybookサンプルを作成

環境

  • ansible
    • 2.14.2

オフライントークン期限切れ防止のPlaybook作成

Red Hat公式サイトで提供されるcurlコマンド

  • Private Automation HubからAutomation Hubにアクセスするためのトークン発行画面にて期限切れ防止のためのcurlコマンドが紹介されている

  • curlコマンド

  curl https://sso.redhat.com/auth/realms/redhat-external/protocol/openid-connect/token -d grant_type=refresh_token -d client_id="cloud-services" -d refresh_token="{{ user_token }}" --fail --silent --show-error --output /dev/null
  • 実行コマンド
    • レスポンスは欲しいので後半のオプションを省く
$ curl https://sso.redhat.com/auth/realms/redhat-external/protocol/openid-connect/token -d grant_type=refresh_token -d client_id="cloud-services" -d refresh_token="{{ user_token }}" | python -m json.tool
  • 実行ログ
    • オフライントークンと別のトークンが出力されていたが公開していいのか分からないので伏せてますmm
{
    "access_token": "よくわからないトークン",
    "expires_in": 900,
    "refresh_expires_in": 0,
    "refresh_token": "よくわからないトークン",
    "token_type": "Bearer",
    "id_token": "よくわからないトークン",
    "not-before-policy": 0,
    "session_state": "beb141b6-1b55-4586-9ac7-a0090a201359",
    "scope": "openid api.iam.service_accounts api.iam.organization offline_access"
}

オフライントークン期限切れ防止のサンプルPlaybook作成

  • Playbook
  - hosts: localhost
    gather_facts: false
    connection: local
    vars:
      ah_offline_token: <オフライントークン書いてね>
    tasks:
      - name: "Automation Hub Offline Token Expiration Prevention API"
        ansible.builtin.uri:
          url: "https://sso.redhat.com/auth/realms/redhat-external/protocol/openid-connect/token"
          method: POST
          body_format: "form-urlencoded"
          body:
            grant_type: "refresh_token"
            client_id: "cloud-services"
            refresh_token: "{{ ah_offline_token }}"
        register: response

      - name: "Debug response"
        ansible.builtin.debug:
          var: response
  • 実行ログ
  PLAY [localhost] ***********************************************************************************************************************************************************************************************************

  TASK [Automation Hub Offline Token Expiration Prevention API] **************************************************************************************************************************************************************
  ok: [localhost]

  TASK [Debug response] ******************************************************************************************************************************************************************************************************
  ok: [localhost] => {
      "response": {
          "cache_control": "no-store",
          "changed": false,
          "connection": "close",
          "content_length": "5660",
          "content_type": "application/json",
          "cookies": {
              "2a4bcc483fa585dc0ad94b51550d0923": "29857b1cb4903eae4c4774926bc13f28"
          },
          "cookies_string": "2a4bcc483fa585dc0ad94b51550d0923=29857b1cb4903eae4c4774926bc13f28",
          "date": "Thu, 06 Apr 2023 12:21:19 GMT",
          "elapsed": 0,
          "failed": false,
          "json": {
              "access_token": "よくわからないトークン",
              "expires_in": 900,
              "id_token": "よくわからないトークン",
              "not-before-policy": 0,
              "refresh_expires_in": 0,
              "refresh_token": "よくわからないトークン",
              "scope": "openid api.iam.service_accounts api.iam.organization offline_access",
              "session_state": "beb141b6-1b55-4586-9ac7-a0090a201359",
              "token_type": "Bearer"
          },
          "keep_alive": "timeout=300",
          "msg": "OK (5660 bytes)",
          "pragma": "no-cache",
          "redirected": false,
          "referrer_policy": "strict-origin",
          "set_cookie": "2a4bcc483fa585dc0ad94b51550d0923=29857b1cb4903eae4c4774926bc13f28; path=/; HttpOnly; Secure; SameSite=None",
          "status": 200,
          "strict_transport_security": "max-age=31536000; includeSubDomains",
          "url": "https://sso.redhat.com/auth/realms/redhat-external/protocol/openid-connect/token",
          "x_content_type_options": "nosniff",
          "x_frame_options": "SAMEORIGIN",
          "x_rh_edge_cache_status": "Miss from child, Miss from parent",
          "x_rh_edge_reference_id": "0.2f9e3a17.1680783679.40bfc1bd",
          "x_rh_edge_request_id": "40bfc1bd",
          "x_site": "prod-spoke-aws-us-east-1",
          "x_xss_protection": "1; mode=block"
      }
  }
  • レスポンスがおおむね同じなので成功っぽい(ステータスも200)

Windows Serverユーザーのパスワードポリシー設定を変更したい

Windows Serverのユーザーのパスワードポリシーがデフォルトだと文字数や複雑性を求められるため、 ポリシー設定を緩和させたい。備忘のためのメモ。

概要

  • Windows Serverのユーザーのパスワードポリシーを緩和させるための設定手順を記載

環境

パスワードポリシー設定手順

  1. サーバーマネージャーの[ツール]から[ローカルセキュリティポリシー]を選択
  2. [アカウントポリシー]-[パスワードポリシー]を選択し、ポリシー一覧から設定を変更する

ActiveDirectoryのグループポリシーによるパスワードポリシー設定手順

  1. サーバーマネージャーの[ツール]から[グループポリシーの管理]を選択
  2. [フォレスト:<ドメイン名>]-[ドメイン]-[<ドメイン名>]-[Default Domain Policy]を右クリックし、[編集]をクリックする。
  3. [コンピューターの構成]-[ポリシー]-[Windowsの設定]-[セキュリティの設定]-[アカウントポリシー]-[パスワードのポリシー]を選択し、ポリシー一覧から設定を変更する
  4. 変更したポリシーをすぐに反映するには、コマンドプロンプトから下記コマンドを実行する。
   gpupdate /force

AWXをRHEL8のK3sにデプロイしてみる

以前はDockerでAWX構築できたけどKubernetes上で動かすようになったみたい
とりあえず使いたいからAWXをデプロイしたい

概要

  • RHEL8にK3sをインストールしてAWXをデプロイします

環境

AWXをK3sにデプロイ

K3sのデプロイ

  1. K3sの公式手順に従いインストールを実施

     # K3sをインストール
     curl -sfL https://get.k3s.io | sh - 
     # NodeのSTATUSが`Ready`であることを確認する
     sudo k3s kubectl get node 
    

AWXのデプロイ

  1. Kustomizeのインストール

     curl -s "https://raw.githubusercontent.com/kubernetes-sigs/kustomize/master/hack/install_kustomize.sh" | bash
    
  2. マニフェストファイルkustomization.ymlを作成

    • 使用するAWX OperatorバージョンはGithubのtagバージョンから選んで書き換えてください。
    • 今回は1.2.0を使用します
     ---
     apiVersion: kustomize.config.k8s.io/v1beta1
     kind: Kustomization
     resources:
     - github.com/ansible/awx-operator/config/default?ref=1.2.0
    
     images:
     - name: quay.io/ansible/awx-operator
       newTag: 1.2.0
    
    namespace: awx
    
  3. マニフェストファイルkustomization.ymlの適用

     ./kustomize build . | kubectl apply -f -
    
  4. マニフェストファイルawx.ymlを作成

     ---
     apiVersion: awx.ansible.com/v1beta1
     kind: AWX
     metadata:
       name: awx
     spec:
       service_type: nodeport
       nodePort_port: 30080
    
  5. マニフェストファイルkustomization.ymlにAWXのマニフェストファイル名を追加

     ---
     apiVersion: kustomize.config.k8s.io/v1beta1
     kind: Kustomization
     resources:
       - github.com/ansible/awx-operator/config/default?ref=1.2.0
       - awx.yml
    
     images:
       - name: quay.io/ansible/awx-operator
         newTag: 1.2.0
    
     namespace: awx
    
  6. マニフェストファイルを再度適用

     ./kustomize build . | kubectl apply -f -
    
  7. Podが起動しているか確認

    • STATUSがRunningであることを確認する
     kubectl get pods -l "app.kubernetes.io/managed-by=awx-operator" -n awx
     ---
     NAME                   READY   STATUS    RESTARTS   AGE
     awx-postgres-13-0      1/1     Running   0          79m
     awx-785589d6c7-hlmth   4/4     Running   0          78m
    
  8. awx-serviceで公開しているPortを確認

     kubectl get svc -l "app.kubernetes.io/managed-by=awx-operator" -n awx
     ---
     NAME              TYPE        CLUSTER-IP     EXTERNAL-IP   PORT(S)        AGE
     awx-postgres-13   ClusterIP   None           <none>        5432/TCP       81m
     awx-service       NodePort    10.43.36.159   <none>        80:30080/TCP   80m
    
  9. AWXの管理画面にログインするため、adminの初期パスワードを確認

     kubectl get -n awx secret awx-admin-password -o jsonpath="{.data.password}" | base64 --decode
    
  10. ブラウザでhttp://<サーバのIP>:30080にアクセスし、ログインする。

    • ユーザー名:admin
    • パスワード:確認したadminの初期パスワード